Pages
▼
March 6, 2016
Springtime Puzzle
Hello There!! Shari here with you today, with a fun little project I made to start celebrating the early Spring--Well, it's early in my neck of the mountains in Northern Idaho!
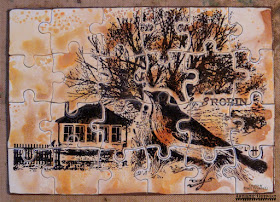
We had our first American Robin of the season in our yard last week, which completely prompted me to pull out my Artistic Outpost Birds of a Feather and The Outpost stamp sets and get to crafting on this Springtime puzzle in its own decorative matchbox.
I found a store on Etsy that sells blank puzzles in many different sizes (info available at my blog) and ended up with a few of them myself! For today's project, I'm using a 3 1/2" x 5" chipboard puzzle.
Before I started stamping and coloring the puzzle, I applied a few pieces of painter's tape to the back, to keep all of the pieces in place.
I created the stained background using Spiced Marmalade and Vintage Photo Distress Inks.
I applied the Distress Inks separately onto the puzzle so the colors wouldn't muddy. I started with the Spiced Marmalade-pressing the pad onto my craft sheet and spritzing with water. I then pressed the puzzle down into the ink and heat set.
I applied Vintage Photo DI to the puzzle in the same way, but added a spritz of Biscotti Perfect Pearls Mist to the ink before I pressed the puzzle into the concoction.
Although I did not capture it very well in this picture, there's a lovely light golden sheen over the surface of the puzzle that's so pretty.
I used one of the Robins from our Birds of a Feather stamp set, and stamped her onto the puzzle with Jet Black Archival. I heat set, masked her off, then stamped the house & tree image from The Outpost set onto the surface of the puzzle. I used my finger to paint the edges of the puzzle with Walnut Stain DP.
I stamped the sentiment, also from The Outpost set, onto tissue paper with Jet Black Archival and fussy cut. I adhered onto the puzzle with matte Decou-Page and heat set then outlined each word using a fine-tip Sharpie.
I used my finger knife to lightly trace the seams of the puzzle where I applied the glue, so the puzzle pieces wouldn't be stuck together.
Now all this puzzle needs in a neat little box to keep all of these pieces in....
Behind the scenes, working with all of the Distress Inks on my craft sheet, I was also working with a plain matchbox and making the panels I decorated the inside and outside of the matchbox with.
This matchbox measures about 4 1/4" x 2 1/2" and is the perfect container for this puzzle.
I used the same Spiced Marmalade and Vintage Photo DIs & Biscotti PPMist to color the background panels that I made for the outside and inside panels of the matchbox, as well as for coloring the outside of the matchbox and drawer.
I added paint cap circles, gift card applied paint lines and dots of paint applied with a pencil eraser to the inside panel of the matchbox drawer and to the outsides of the entire matchbox. I also ran the front and inside panels through my sewing machine to add the stitched border.
I added brass eyelets to the drawer and tied a piece of jute twine through the holes to form this cute little pull. This is a good close-up of some of the paint details that are on the outside of the matchbox and its drawer.
I wrapped the outside of the matchbox with a piece of natural trimmings, then adhered the front panel to the matchbox with matte Decou-Page. I held the front panel in place with 4 clothespins until it was secure and finished with a little touch of bling with a rhinestone where the period should be on the word band.
Thanks so much for joining me today. I hope you enjoyed today's puzzle & matchbox project as much as I enjoyed altering everything to create this early ode to Spring! Blank Puzzle + Artistic Outpost Images = FUN!!
Speaking of FUN--Join us in our March Show Us Your AO Art Challenge! It runs all month long until 11:55pm CDT on March 31st, so you've got lots of time to add your Artistic Outpost images to a project to create your own FUN!!
Designer: Shari Trumbull
Ain't That Artsy Fartsy


Gorgeous Shari, love it x X X
ReplyDeleteThank You, Tracy!! :) :) XO-S
ReplyDeleteOh how clever you are, Shari! I love the box and the puzzle is just too fun! Great idea! Hugs!
ReplyDeleteThank You, Terry! This was a fun project to make! :) XO-S
ReplyDeleteShari, thank you, this project is absolutely genius! And so well made. I love the idea of using the matchbox. The two stamp sets look fab together. And your tutorial is excellent. Will definitely Pin this post as soon as I hit enter on this comment. xoxo
ReplyDeleteGorgeous make Shari
ReplyDeleteWow, Shari- this is absolutely fabulous!! Love the images that you chose to use on your puzzle card and box- just gorgeous and inspiring!!
ReplyDeleteNow that is amazing.
ReplyDeleteThank You, Julie!! The Robin's made me do it!! :) :) XO-S
ReplyDeleteFabulous!!! Love this again, Shari, what a great way to use these wonderful bird and nature stamps at the very best! Hugs, Coco xox
ReplyDelete